Structure guidelines

Create a helpful structure for all data tables using accessible guidelines

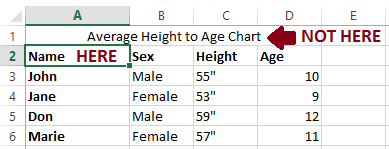
Most Excel spreadsheets include one or more sets of data, which are typically laid out in table format with headers for the columns or rows, or both. Concise header information is imperative so individuals with disabilities can use assistive technology to read them and understand the data set.

Note: The methods below will not automatically update headings when new rows or columns are added. Add data and labels to the table first, then define the headers. This method only applies to a single level of headers. Complex tables will need to be simplified or restructured.

Defining headers for sheets with only one set of data

Steps

  1. Select the cell in the upper-left corner of the dataset.
    Note: this will generally be the first cell in the second or third row of the Excel sheet since the first row typically contains the data set title.
  2. Go to the Formulas tab on the Ribbon.
  3. Click the Define Name option from the Defined Names group.

A dialog titled “New Name” should appear.

Excel spreadsheet showing cells A1 through E6.  The first row contains the sheet title and there in an annotation saying “NOT Here”.  Cell A2 is selected and contained the text Name and the annotation saying “HERE”, indicating this is the cell that should be selected.
Use the Formulas tab to define names.

Within the dialog's Name field, replace the existing text with one of the following three values, depending on the data set’s headers:

  • For column headers only (horizontal headers in lettered cells), enter ColumnTitle.
  • For row headers only (vertical headers in numbered cells), enter RowTitle.
  • For both column and row headers, enter Title.

Note: The header information only needs to be defined in the first cell for the data set. Do not repeat this step for other header cells within the same data set because this may cause conflicting information to be presented to users of assistive technology.

The header information should only be defined in the first cell for the data set. Do not repeat this step for other header cells in the same dataset, as it could cause conflicting information to be presented to users of assistive technology.

Excel New Name dialog with the Name field highlighted and containing the text “Title”.
Rename column headers, row headers, or both in the New Name dialog.

Defining headers for sheets with multiple unique datasets

Steps

  1. Select the cell in the upper-left corner of the dataset.
    Note: this will generally be the first cell in the second or third row of the Excel sheet since the first row typically contains the data set title.
  2. Go to the Formulas tab on the Ribbon.
  3. Click the Define Name option from the Defined Names group.
  4. Specify TitleRegion in the Name field.
  5. Apply the following naming convention:
    • A unique number within the sheet
      • e.g., 1 for the first dataset, 2 for the second, etc., followed by a period (.)
    • The first (upper-left) cell in the dataset
      • e.g., A2, then a period (.)
    • The last (lower-right) cell in the table
      • e.g., C5, then a period (.)
    • The sheet number
      • e.g., 1 for the first sheet in the workbook

Note: RowTitleRegion or ColumnTitleRegion can be used in place of TileRegion for datasets that only have row or column headers. 

Screenshot of Excel spreadsheet sheet 1 with the first row containing a title and cells A2 through D6 containing data.  The New name dialog is also shown with the name field highlighted and containing the text “TitleRegion1.A2.D6.1”.
Using this naming convention, the table's name would be TitleRegion1.A2.D6.1.